Accessibility
Access to BAIS applications from off the network
How to Use ASL Interpretation in Zoom
How to add captions to a video
How to request captions and transcripts for videos from 3Play Media
Accounts
How to create or re-enable a Sponsored Account
Do I have a virus or malware on my computer?
Getting Started with Microsoft 365
How to Change Student Passwords in Clever
How to Log in to Aspen With Your BPS Google Account
How to access EdPlan
How to access the BPS Lending Library (myTurn)
How to change your last name and BPS email address
How to enable/disable a Sponsored Account
How to login (or reset your password) for the DESE Security Portal
How to request access to PeopleSoft
I Am Getting "You Have Successfully Logged Out" Message When Signing into Peoplesoft Financials.
Staff Passwords: How to reset/change
Updating your Password or Update your MFA Email for MA Education Security Portal
What is the BPS Acceptable Use Policy?
Zum Transportation
Artificial Intelligence (AI)
Guidance on the Use of Artificial Intelligence in BPS
How to access Gemini
How to access NotebookLM
How to access Panorama Solara
How to Use Zoom AI Companion
How to access Brisk Teaching Chrome Extension
How to access Diffit for Teachers
How to access Magicschool.ai
Aspen
Athletics
Athletics Registration Workflow
Athletic Filters
Athletics Program - District View
How Students are Enrolled in the Athletics Program
How to Manually Enroll Students in the Athletics Program
How to Remove Students from Athletic Sections
How to Schedule Students into Athletic Sections
How to Update Physical Exam Information for Athletics - Nurses
How to Update Student Athletic Information - Program Tab
How to Update Student Athletic Information - Student Tab
How to view Student Sports Registration Information - Coaches
How to view and print student Athletic Program records
Attendance
How To Run the Attendance Grid Report
How to "Push" Daily Attendance to all Classes
How to Add Attendance for One or More Students for Multiple-Dates
How to Automatically Create Journal Entries by Running Attendance Letters
How to Change Attendance Records
How to Change Daily Attendance Preferences to Period
How to Edit Daily Attendance (Teacher)
How to Log in, Take Attendance and Make Calendar Days in Session in Aspen (For Private Schools)
How to Make Constructively Present or any other Attendance Input Buttons Available to Your School
How to Make a Calendar Day in Session
How to Mark Attendance Complete (To enable Attendance Notifications be sent via ParentSquare)
How to Mark Attendance Complete (to enable the daily call)
How to Reassign Calendar Days in Aspen
How to Reconcile Daily and Class Attendance
How to Run Attendance History for a Specific Code
How to Run Class Attendance Post Verification Report
How to Run Daily Attendance Post Verification
How to Take Attendance in the Daily Office in School View (For Attendance Managers)
How to Take Class Attendance (Teachers)
How to Take Daily Attendance in Aspen (Teachers)
How to Update Student Calendars to Make Students In-Session for Attendance Input
How to add a Tardy and Dismissal for a Student in Aspen
How to run the Perfect Attendance Report in Aspen
How to update Withdrawal Codes for DNR Students
How to use the Principal's Attendance Report in Aspen
Managing Attendance Intervention Plans
Overview of Attendance Intervention Plans in Aspen (video)
Recommending an Attendance Plan for Court
Communicating Through Aspen
How to Create and Send Administrator Notifications (Computer & Mobile)
How to Download and Activate the Follett Notifications App (Mobile)
Using the CK Editor - Announcements, Emails, Banners
Conduct
Hearing Notification and Suspension Letters
How to Add a Student Conduct Incident (For Conduct Managers)
How to Assign Students to Administrators for Conduct Referrals
How to Enter Emergency Conduct Removal
How to Generate a Conduct Letter in Aspen
How to Run Student Journal and Conduct Reports
How to Submit a Conduct Referral - For Teachers
How to Submit a Conduct Referral in Aspen (For Teachers)
End-of-Year Processes
End Of Year Rollover Information/FAQ
How to Enter Student Homerooms After the End-of-Year Rollover
How to Enter a Student's Next Year Homeroom in School View
How to Promote or Retain Non-Senior Students
Technology Returns for Transferring & Departing Employees
Enrollment
Family Portal
How to Find the Password Verification Code in a Family Aspen Account.
How to Generate Parent Letters with Security Code
How to Publish Reports to the Parent and Student Portal
How to Request a Parent Account (TEMPORARY)
How to See your Child's TerraNova Score on Family Portal
How to Update Contact Portal Login with email address
How to see Your Child's GPA - Family Portal View
Parent Passwords: How to Reset a Parent Portal Account/Password (For School Staff)
Parent Passwords: How to Reset your SIS Family Portal Account Password
Gradebook
Elementary/Standards Based Specific
How to Post K0-K2 Grades in Aspen
How to Post Remote Learning K0-K2 Grades
What are the Reporting Standards for My Class?
What is the Rating Scale for My Class?
Middle and High School Specific
How to Enter Teacher Course Recommendations for the Next School Year
How to Post Term 4 and Final Grades
Quick Reference Cards
Advanced Gradebook Quick Reference Card
Beginning of the Year Gradebook Checklist
Gradebook Basics
Teacher Class Groups and Pages
How the Final Grade is Calculated
Creating Special Codes in your Gradebook
Example 0-4 Grade Scale
How to Attach Your Own Grade Scale to Sections or Assignments
How to Auto Calculate and Post Grades in the Gradebook
How to Create Your Own Grade Scale
How to Create a Grading Column with Assignment Averages
How to Fix Expanding Columns Issue in Chrome
How to Post Grades for Enrolled and Withdrawn students
How to add a Class Announcement with Zoom Link
How to add resources to a gradebook assignment
How to create and post a Class Announcement - Staff View
How to use the Google Classroom Gradebook Sync to Aspen
Locking Scores in your Gradebook
Setting up your Gradebook Preferences
Teacher Gradebook PowerPoint
Grades Management
Grade Point Average (GPA)
GPA Frequently Asked Questions
How to see Student GPAs from the Student Tab
How to view an Individual Student's Grade Point Average (GPA)
What are the different types of GPAs and GPA Reports?
What are the point values of a grade?
Grade Scales
Alternate Pass/Fail Grade Scale
Assignment Pass/Fail Grade Scale
BPS Final Grade Scale
BPS Grade Scales
BPS Standard 1-5 Grade Scale
BPS Standard A-F Grade Scale
BPS Standard Kindergarten Grade Scale
IB Grade Scale
What is the MFG Grade?
Where are the Grade Scales in Aspen?
Work-Based Learning Grade Scale
Report Cards
Transcripts
Finding all Transcripts Record for a Student
How to Change an Elementary Transcript Record
How to Enter Transfer-in Transcript Records
How to Enter and Post Elementary Grades in Aspen
How to Find Missing Final Grades
How to Run Qualification Lists (Honor Roll, D&Fs, Eligibility Lists)
How to See a List of Failing Students in One or More Terms
How to Update the Gradebooks with the Transcript Grades
How to run a merge drop/add transcript records
Grading Manager
How to Calculate Averages - Final Grades
How to Calculate Credits - Populate Credit on Transcript Records
How to Correct MFG and Empty Transcript Records (School View)
How to Post Grades for the Entire School
How to Re-Open Grading Window
How to See Students Grades by Class and Grade Level
How to Update the Grade Cover Term Map and Reassign Calendar Dates for Attendance Input
How to find Specific or Missing Term Grades - District View
How to find Specific or Missing Term Grades - School View
How to run the Grade Post Verification Report in Aspen
How to view MFG and Empty Transcript Records - District View
School Preferences - Grade Category
Student Records Requests
Health
Reports
Graduation Requirements
How to Run The Official Student Transcript Report
How to Run the Class Office Period Attendance Report
How to setup and run the Out of District Official School Transcript report
Running Report Cards (Grade 1-5) - Bilingual
Top 10 Aspen Reports for Principals and School Administrators
Scheduling
Career and Vocational/Technical Education (CVTE)
Aspen Tables and Fields with CVTE Data
How to See District Level CVTE Courses
How to see School Course Sections of CVTE Courses
How to see Students Scheduled into CVTE Sections
How to see schools with CVTE courses
Committing Your Schedule
Daily/Walk-in Scheduling
Counselor Fundamentals and Daily/Walk-In Scheduling
How to Drop and Add a Student from a Section at the Same Time to keep Transcript Records
How to Schedule a New Student in Aspen (Grades K0-5)
How to Schedule a New Student or Make Changes to a Student's Current Schedule (Grades 6-12)
Dual Enrollment
Group/Homeroom Scheduling
Change a Student's Homeroom and Reschedule into New Sections
Create and Assign Platoon Codes for Elementary Scheduling
Elementary Group Scheduling: Multi Grade Homerooms or Mix Grade Classes
How to Run Group Scheduling based on Platoon
Schedule Build
How to Copy the Course Catalog to the Build Year
How to Copy the Courses In the Master Schedule to the Build Year Course Catalog
How to Create a Scenario or Copy the Current Year Schedule to the Build View
How to Enter Next Year School to be Able to See Returning Students in the Build View
How to create a Clever Sync Block
Patterns and Pattern Sets
School Courses
Course Attributes
How to add a Course to Your School Course Catalog
New Course Request and Approval Process
Sections
How to Add a Teacher to Multiple Course Sections
How to Change Course Section Details
How to Create a New Course Section
How to Import Assignments from Another Class section or Year
How to Remove a Co-Teacher from a Class in Aspen
How to Transfer Students From one Section to Another and Keep the Grades
How to change a Primary Teacher in Aspen
Restore Deleted Section
Student Course Requests
CTE Data Analytic for DOE 35, 43, 44
Finding Students Missing Schedules for SIMS Reporting
How to Add A Schedule to a Middle School or ESL Class to Allow Class Attendance Input
How to Add Schedule to a Class
How to Assign a Schedule to Homeroom sections to Enable them to Appear on Panorama
How to Balance Sections by Student Cohort Code
How to Create Platoon Codes
How to Create a Report for Students Registered in Online Courses Only
How to add a Co-Teacher to a Class
How to add a Student Secondary School Association
Overview of the BPS Course Catalog in Aspen
Quick Status Alert and Bell Schedules
STRIVE Program set up and Schedule
State and Federal Reporting
State Reporting
EPIMS
Creating an Import file for EPIMS Staff WA07 Role and WA08 Import
Locating EPIMS Reports 02
Run Individual Staff Reports
Update MEPID characteristics
Using EPIMS Template
Using Pando for EPIMS
SIMS
DH Appendices
How to Find Sections Missing an Active Staff
How to input Early College and Innovation Pathway participation in Aspen for SIMS
Student
Accessing Services only Students in At Home School
Adding Future Capacity, Proposed Fields
Finding Students with missing schedules by Subject
Home Learning Tips for Students & Families
How to Accept a New Student to Your School in Aspen
How to Add an Internship Program in Aspen
How to Assign Locker Numbers to One or More Students
How to Change Student Cell Phone Numbers in Aspen
How to Change a Student's Grade Level?
How to Create a Fieldset and Generate a Spreadsheet or Report
How to Enter a Single Student Journal Entry
How to Filter for a Specific Cohort of Students
How to Find Students With 3 or More Suspensions in Previous School and Year
How to Generate a Parent Email List
How to Run the Student Sibling Report
How to See Next Year Student Assignments, Incoming Students, and Wait List Totals
How to Update ESL Minutes, Instruction Type and Teacher in Aspen
How to Update Parent Emails and Phone Numbers
How to Upload Individual student Photos
How to Upload Student Photos into Aspen
How to Upload a Document in Aspen
How to View Low Income or Food Status (For Principals Only)
How to Withdraw or Discharge a Student in Aspen
How to add Journal Entries for one or more Students
How to add an alert on the student record
How to enter in Student Next Homeroom in School view from the Student top tab
How to search for a Student by Address
How to search for a student by name or ID number
How to see Detailed Information about Pending Students Assigned to your School
How to update data sharing opt-outs in Aspen
How to view students who have opted out of the media release
How to view the change history for a record
Methods to enter in Student Next Year Homeroom
School Leader Guide: Spring 2021 Cohort + Learning Models
Updating Students' Next Year Homeroom
Student Portal
How Can Students View their Report Card/Progress Report Grades in the Student Portal
How to Register for Athletics - Student View
How to view your Grade Point Average (GPA)
Student Programs
Summer School
Dropping a Student(s) from a Summer School Class Section
How Can Site Coordinators Take Daily Attendance on the School View
How Can Students see their Summer School Schedule in Aspen
How Can Teachers Take Class Summer Attendance
How Can Teachers Take Daily Summer Attendance
How Teachers can see their Summer Classes in the Gradebook
How teachers can see their Summer School Schedule in Aspen
How to Access your Summer School
How to Add Your Current School Staff to your Summer School
How to Add a Schedule to a Summer Class to Allow Attendance Input
How to Create Summer School ESY Classes and Add Students and Teachers For Attendance Input
How to Create a New Summer Program in Aspen (Central Office Staff Only)
How to Enroll a Student in a Summer Program in the BPS View (BPS Central Office Summer Staff Only)
How to Enter and Post Summer School Grades on the School View (For Site Coordinators)
How to Import Avela Summer School Student Registrations in Aspen (For Central Office Staff Only)
How to Import ESY, ESI, and HSCR Summer Student Registrations in Aspen (For Central Office staff Only)
How to Remove Students from Summer School
How to Run the Summer School Attendance Completion Report (Central Office Managers only)
How to See a Summer School Program Capacity
How to See the Student list for your Summer Program from your Summer School
How to Select a School in the School View in Aspen
How to Update the Details of an Existing Summer Program (Central Office Staff Only)
How to View Registered Summer School Students from your Current School
How to View Summer School Grades
How to View your Summer Students from the Student top-tab in your Summer School
How to add Courses to Summer Programs to Allow School Staff to Enroll Students (BPS Central Office Summer Staff Only)
How to find Summer School Students Missing Current Day Attendance
How to run the Grade Post Verification Report for a Summer School
How to view Summer School Grades on Transcripts
How to Register a Student to a Summer Credit Recovery Program
Summer School Registration 2026
Tools
Transportation
Aspen Transportation Reports
How to Assign T-Pass to a Student
How to Run the Alpha List Report or Student Directory with AM and PM bus
Widgets
Creating a Snapshot
How to Add My Classes to my Pages tab
How to Add Parent Gender in Aspen
How to Add a Page to the Pages tab
How to Add the Tasks Widget to Your Home Page
How to Change Your Default View in Aspen
How to Create or Edit a Field Set
How to Fix K-5 Student Rosters in the Wrong Grade Level Class
How to Remove Staff from your Roster
How to Run Progress Reports in Aspen
How to Switch to the School View
How to Use Mass Update to Quickly Make Data Changes
How to enable Chrome to download reports from Aspen
How to use Modify List to Quickly Make Data Changes
Query By Grade Level and ELD Level
Withdrawal Code Guidance
Assessments
How to See Assessment Scores for Multiple Students
How to configure your Chromebook for the WIDA/Access test
How to view an individual student's assessment scores
MAP Troubleshooting
MCAS 2.0 Test Coordinators Handbook
Avela
BPSLearns
How to access All Staff Required Trainings in BPSLearns
How to access BPSLearns
How to Access the Bullying Prevention and Intervention 26-27 Course
How to Access the Custodial Asbestos Awareness Training
How to access the Conflict of Interest Law Training
How to access the Equity and Priority Circulars Training, 25-26
How to get started with GoGuardian for Teachers
How to manage notifications in BPSLearns (Brightspace)
How to receive an L4L (Teacher Macbook)
Clever Apps
Clever Troubleshooting and Adding Apps
How to access Clever
How to use Clever Badges
Requesting Apps and Chrome Extensions
How to Access Reading Horizons
How to access & use Nearpod
How to access Activate Learning
How to access Adobe Express
How to access Albert.io
How to access Bookshare
How to access Canva
How to access Clever at Home
How to access CommonLit
How to access DBQ Online
How to access EVERFI
How to access Edmentum Courseware
How to access Exact Path
How to access Find Your Grind
How to access Gale & Nat Geo Kids
How to access Goalbook Toolkit
How to access IXL Learning
How to access Imagine Apps
How to access Legends of Learning
How to access Lexia
How to access LiveSchool
How to access McGraw Hill products
How to access Mystery Science
How to access Naviance
How to access Panorama Student Success
How to access Rosetta Stone
How to access ST Math
How to access Savvas
How to access Seesaw
How to access Sora by Overdrive
How to access StudySync
How to access Sworkit
How to access ThinkLink
How to access Vista
How to access n2y
How to troubleshoot "Offline" status in Seesaw
I am a co-teacher and I do not see my students in Clever.
I have a student missing from my class in Clever
My students cannot login to an app in Clever
What is a Clever School Tech Lead and what can they do?
When I log in to Clever, I get an "Uh oh!" (sad robot) error message.
Communication
ParentSquare
Secure Document Delivery
How to Create a Secure Document in ParentSquare
How to Send Attendance Nudge Letters with ParentSquare
How to Send Progress Reports with ParentSquare
How to Send Report Cards with ParentSquare
How to Create Managed Groups in ParentSquare
How to access ParentSquare
How to update language settings in ParentSquare
ParentSquare Absent\Tardy Calls
Zoom
How do I get started with Google Meet?
How do I get started with Zoom?
How to Add Authentication Exceptions in Zoom
How to Help Students Who Are Unable to Join Zoom Meetings with User Authentication
How to Live Stream Using Zoom
How to Run a Successful Video Conference
How to Set Up Zoom Meetings as a Sub
How to Set Up and Use Spoken Language Interpretation in Zoom
How to enable live transcript CC in Zoom
Joining Zoom from your browser or a Chromebook
Recommended Zoom Settings for Security
Zoom Basic vs. Zoom Licensed: What are the Differences?
Zoom Instructions for Students
Zoom Meeting Pro vs. Zoom Webinar: What Are the Differences?
Zoom vs. Google Meet: When Should I Use Each Tool?
Access your BPS phone voice message system
How do I send or receive a fax?
How to Setup your BPS Email (on a mobile device)
How to use Wifi Calling on your Cell Phone
Set call forwarding on a BPS Phone
Devices
Airtame
Chromebooks
Access 4 All Chromebook Initiative
Access 4 All Chromebook Repair Process
Common Chromebook Issues & Fixes
Disperse Collected Devices from a Group
Running Reports on TDT Asset (One2One)
TDT-Asset Helpdocs Hub
TDT-Asset Navigation
Understanding Incidents in TDT-Asset (formerly One2One Manager)
What are some free/low cost internet options?
Connecting a Chromebook or Android to BpsStaff/Student
Create an Incident in TDT-Asset
Getting Chromebook IP address and WiFi MAC address
How Do I Update the Chrome OS Version on a Chromebook?
How do I configure Chromebooks that I received from Donor's Choose?
How do I take a screenshot of my Chromebook screen?
How to Factory Reset a BPS Chromebook
How to Install a Printer on a Chromebook
How to use Kiosk Apps (aka locked browsers) on Chromebooks
Tips for keeping student devices clean
What does it mean when a Chromebook is "end of support"?
Hotspots
Mac
"MacOS Could not be installed on your computer" screen after start up
5 Tips to Improve your MacBook Performance
How do I install GarageBand or iMovie?
How to Connect a Mac to BpsStaff/Student
How to Setup your Tap Card (Follow-You) Printers (MacBook only)
How to backup your data on a L4L (MacBook)
How to convert a PDF into a Word document
How to enable screen recording in macOS
How to redact information on a PDF without Adobe Acrobat
How to remove Malware from your Macbook
L4L Frequently Asked Questions
Macbook Features (L4L Users)
Managing Loaner Macs
Mirrored vs. Extended Display Settings
My Mac won't let me install a program.
Setting Up Your New L4L Macbook
Staff Passwords: How to sync with your Macbook
PC
How to Connect a PC to BpsStaff/Student
How to Install a FollowYou Printer on a PC
Safe Mode on Windows Device
Polycom Studio
How to Pair the Polycom Studio Remote
How to fix a blinking yellow light on the Polycom Studio
Polycom Studio Camera Setup
Printers
ViewBoards
ViewBoard Basics: Install vCastSender App to Enable Touchscreen
ViewBoard Basics: Toolbar & Control Panel Guide
ViewBoard Basics: Use AirSync to Wirelessly Screenshare
ViewSonic ViewBoard Interactive Display Guidance
iPad
My wireless keeps disconnecting or changing networks!
SD Cell Phone Workflow
e-Waste & IT Recycling Guidance
Digital Citizenship & Cyber Security
Phishing/Spam Emails
How Does the BPS Filter work?
How does the "Document Sensitivity" label work in Google Drive?
How to maintain student privacy online
How to stay SAFE when shopping online
Google Apps
Adding/subscribing to another Google Calendar
Getting Started with Google Classroom (Teachers)
Google Classroom Interactive YouTube Questions
Google Classroom Practice Sets
How does the Google Classroom roster sync work?
How to Run a Google Classroom Student List as a Teacher
How to Run a Google Classroom Student List as an Admin
How to Upload your Google Classroom List to your Drive to open it in Google Sheets
How to access Google Classroom (Students)
How to access Read&Write for Google Chrome & OrbitNote (PDF Reader)
How to archive or restore a class in Google Classroom
How to install Android apps on a Chromebook
How to remove Extensions from Chrome
How to unblock Flash Player in Chrome
I cannot login with Google on an app or website
Reset Google Chrome Settings
Troubleshooting Aspen-Google Classroom Sync Issues
YouTube Permissions for Students
Miscellaneous
DataChecker
Can I show a Movie in my Classroom?
Editing Ticket Fields in Kace via email
Report Address Issue to Google
Staff
Vector Solutions
How to Create a Course in Vector
How to Navigate Vector Solutions' New Look!
How to access Vector (Evaluation and PD platform)
How to get a list of attendees by email on Vector
How to sign up for PD in Vector Solutions
New Employee Guide
How to Add a New Staff Member to Your School in Aspen
How to submit vaccine proof to the City of Boston
How to use the PingID App with AccessBoston
Maximo - Building Maintenance Request - Work Order
Pending Vector Credits: How to complete the Feedback Form
Updating or adding phone numbers in Employee Self Service
Work from Home (WFH) Tips
untitled category
- All Categories
- Devices
- Polycom Studio
- Polycom Studio Camera Setup
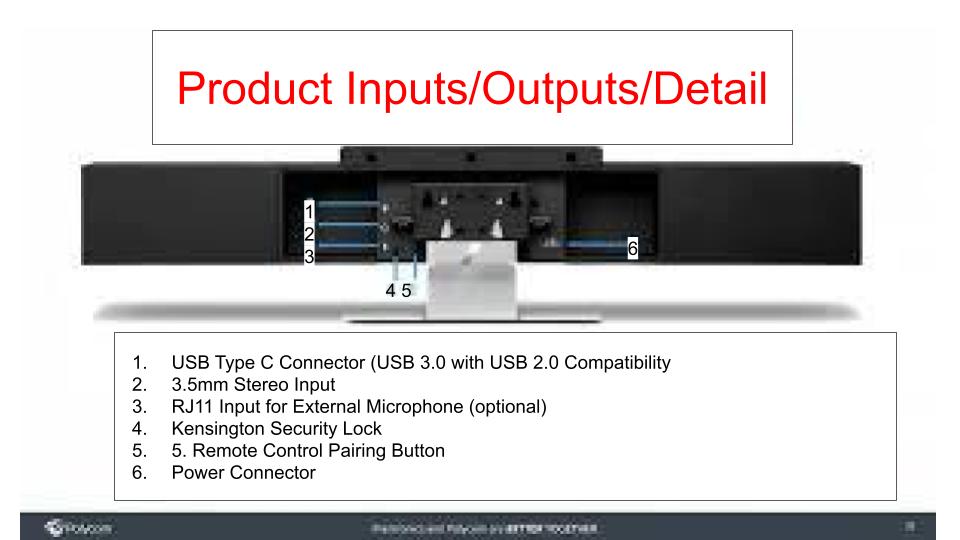
Polycom Studio Camera Setup


Features of the Polycom Studio Camera
- Camera has a 120 degree ultra-wide lens
- Device is portable and can be set up in more than one location throughout the day
- Compatible with Zoom and Google Meet
- Change the camera angle by movement/audio or the push of a button on the Remote Control
- Preset Camera angles on the Remote Control
- Speaker tracking/camera angle (light above the camera)
Uses for Polycom Studio Camera in school
Online Meetings:
- IEP Meetings with service providers and families (when participants are unable to attend in person)
- Student Conferences (when participants are unable to attend in person)
- Staff PD: Staff members in various rooms throughout the building (meeting by grade level, content area, etc.)
Virtual Field Trip, School Wide Celebrations, Buddy Classrooms/Schools:
- Online guests can see all of the students rather than one participant
External speakers: connect to a computer or Airtame projection device to project audio output
Setup Instructions
- Connect the Polycom Studio Camera to MacBook or Chromebook via USB cord.
- Plug Polycom Studio Camera power cord in an electrical outlet (Polycom Camera light above the camera illuminates).
- Connect to Zoom and begin a meeting.
- From Zoom window, click on the ^ next to the Stop Video from Zoom toolbar; Choose Polycom Studio Camera from “Select a Camera.”
Placement
- Determine the placement of the camera that is best for your classroom situation
- Remember, your Polycom Studio Camera will need to be connected to a computer
How to Pair the Polycom Studio Remote
- Turn the Polycom Studio camera bar upside down.
- Locate the bluetooth pairing button and press the button with your finger until you hear a chime. The lights on the top of the camera bar will pulse blue to indicate that it is in pairing mode.
- Long-press the Mute button on the remote control until you hear a notification chime.
- The lights will stay solid blue for three seconds and the remote is now paired with the camera/speaker bar.
Polycom Studio Camera Remote
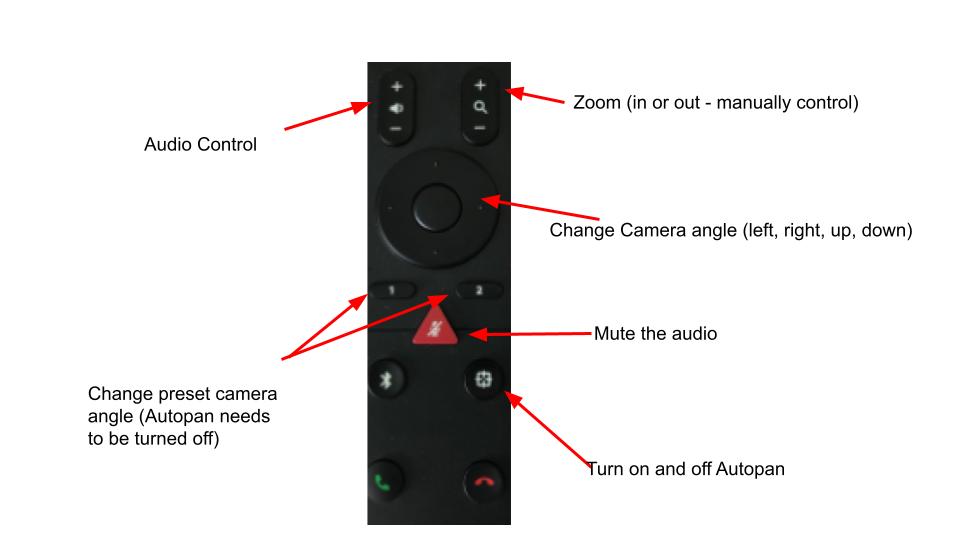
- The Polycom Studio Camera has built-in Audio and Video Settings.
- The red icon button (triangle) will mute you in Zoom.
- The button with the square shape will turn on and off auto-tracking (camera following the speaker/movement).
- When tracking is turned off (button with square shape), you will be able to use the Up, Down, Left, Right arrows to control the camera manually.
- With tracking off, you are able to manually zoom in or out (button in the upper right corner).
Preset Buttons (1 & 2)
- Manually move the camera to your desired view/camera angle and hold down the 1 or 2 to set your camera angle.
- Toggle between the 1 or 2 button to change the view/camera angle.
- Reset/Reactivate Auto-Tracking, press the button on the bottom right of the remote.